Thursday, January 31, 2019

Spicy Beef Keto Hot Pockets

If you’ve not tried our Keto Hot Pockets yet, you’re in for a treat. These spicy beef hot pockets are packed full of flavour, not too hot but if you’re a chilli lover you can totally up the anti and go chilli mad.

I served these low-carb spicy beef hot pockets to Mr B (my food critic and chief taste tester) and I couldn’t help but chuckle at the big thumbs up, you’re through to the next round wave. He thinks he’s John Torode off Masterchef! LOL!

These keto-friendly hot pockets make a great low carb lunch idea or comfort food dinner, served with a simple side salad.

Preparation time
Hands-on:    15 minutes
Overall:     35 minutes
Nutritional values (per serving)
Total Carbs 9.8 grams
Fiber 2.6 grams
Net Carbs 7.2 grams
Protein 40.3 grams
Fat 49.8 grams
of which Saturated 18.3 grams
Energy 647 kcal
Magnesium 99 mg (25% RDA)
Potassium 767 mg (38% EMR)

Macronutrient ratio: Calories from carbs (5%), protein (25%), fat (70%)

Ingredients (makes 2 servings) Filling:
  • 1/2 small brown onion (35 g/ 1.2 oz)
  • 2 garlic cloves (6 g/ 0.4 oz)
  • 1 tsp ghee or butter
  • 300 g ground beef (10.6 oz)
  • 1 - 2 small chile peppers, chopped (10 g/ 0.4 oz)
  • 1 tsp coconut aminos
  • 1 tsp Sriracha sauce (you can make your own Sriracha)
  • 1/4 tsp sea salt, or to taste
  • 1/4 tsp black pepper, or to taste
  • 1 cup fresh spinach (30 g/ 1.1 oz)
Dough:
  • 3/4 cup grated mozzarella (85 g/ 3 oz)
  • 1/3 cup almond flour (33 g/ 1.2 oz)
Instructions
  1. Preheat the oven to 200 °C/ 390 °F (conventional), or 180 °C/ 355 °F (fan assisted). Chop the onion and garlic. Heat the ghee in a non stick or cast iron pan on a medium heat.
  2. Add the onion and fry for 2 minutes until soft. Add the garlic for a further 30 seconds. Add the beef and cook for approximately 5 more minutes until cooked through, breaking the mince up with a spatular until fine.
  3. Add the chilli, coconut aminos, sriracha and season to taste. Stir through the spinach, cooking for 1 - 2 minutes until wilted. Turn off the heat and place to one side.

  4. Melt the mozzarella and cream cheese in a microwave for about 60 seconds until the mozzarella melts. Add the almond flour and mix to combine to form a dough.
  5. Roll between two sheets of greaseproof paper or one sheet and a silicone matt.

  6. Place the chilli beef mixture in the centre and fold to seal the dough.

  7. Careful prick or slice a few air holes in the top.

  8. Place on a greaseproof lined baking tray and bake in the oven for about 20 minutes or until golden.

  9. Best served fresh - enjoy!

  10. The pockets can be frozen for 2 months and then placed in the oven to reheat.
http://bit.ly/2Tkpysg

Wednesday, January 30, 2019

Low-Carb Chocolate Truffle Cake

This keto Chocolate Truffle Cake is such a treat for birthdays, anniversaries, Valentine's Day, Thanksgiving and Holiday season, or any special occasion!

Super decadent, we start off with an easy low-carb chocolate cake, fill it with smooth chocolate buttercream, the top it all off with chocolate truffles and chocolate shavings.

If you’ve been keto for a while I’ll warn you that this cake isn’t “keto sweet”, it’s just sweet. Over time when we stop eating sugar our taste for it diminishes and sweet things taste overly sweet, that’s the case here so I’m giving you a few options on how to make it less sweet. Now, if you’re making this for an occasion where not everyone is low-carb then I suggest leaving it as is as it just tastes like an amazing cake and has the right level of sweetness that everyone will expect.

If you’re making it for just keto folks I would suggest reducing the sweetener in the icing by half, and adding a bit more cacao. You can also swap out some of the butter in the buttercream for cream cheese which will help it be creamy and airy without as much of the sweetener. Otherwise, give this cake a go and I’m sure it will become a favorite!

Preparation time
Hands-on:    30 minutes
Overall:      1 hour 30 minutes
Nutritional values (per serving)
Total Carbs 12.8 grams
Fiber 5.6 grams
Net Carbs 7.2 grams
Protein 9.3 grams
Fat 40.3 grams
of which Saturated 19.1 grams
Energy 421 kcal
Magnesium 116 mg (29% RDA)
Potassium 392 mg (20% EMR)

Macronutrient ratio: Calories from carbs (7%), protein (9%), fat (84%)

Ingredients (makes 16 servings) Cake: Icing: Toppings:

Note: See intro for suggestions on how to reduce the sweetness and make this keto treat more bittersweet.

Instructions
  1. Start by making the Three Ingredient Keto Chocolate Truffles. I used just half of the recipe. You can make 8 truffles, or up to 16 small truffles to have 1 truffle per each serving.
  2. To make the cake, preheat the oven to 165 °C/ 325 °F and grease two 20 cm (8 inch) round cake pans. In two separate bowls mix together the wet and dry ingredients respectively.

  3. Pour the wet mixture into the dry and mix together well. Pour the batter into the prepared pans. Smooth out the top, transfer to the oven and bake for 30 minutes or until a toothpick inserted into the middle comes out clean.
  4. When the cake is done allow to cool completely before removing from pan. Carefully wrap the cakes in plastic wrap and place in the refrigerator overnight if time allows.
  5. To make the icing combine all of the ingredients in a large bowl and beat with an electric hand mixer until light and fluffy. Transfer 1 cup of frosting to a piping bag fitted with a star attachment.
  6. Place one of the cakes on a cake stand with the bottom side facing up. Place 1 1/2 cups of frosting in the middle and spread outwards with an offset spatula until it’s evenly distributed with a bit of overhang. Place the other cake on top with the flat side facing down.
  7. Top with remaining icing and smooth out the top and the sides. Now you can create whatever design you’d like on the sides. I used the back of a spoon to pull lightly through the icing to create vertical stripes.

  8. Use the piping bag to place a line of frosting around the base. Place 8 stars of icing around the top of the cake and top each with a truffle, place another star between each of those and one in the middle.
  9. Top with chocolate shavings and serve.
  10. Store in an airtight container or covered tightly with aluminum foil or plastic wrap in the refrigerator for up to 7 days.
http://bit.ly/2Tmr7WF

Tuesday, January 29, 2019

Super Smooth Low-Carb Strawberry Jam

Strawberry jam, such a staple for breakfast but many of the store bought jams are loaded with unhealthy sugar. This Smooth Strawberry Jam is sugar free and can be made sweetener free (although you can add a keto sweetener if you like) and it's super simple to make.

Made with grass-fed gelatin for a gut friendly start to the day. Collagen helps repair the gut lining, especially useful if you have any kind of autoimmune condition like me. You can enjoy this jam as a set jam or spreadable. If you keep it in the fridge, it will firm up again, but give it a good stir and it’ll loosen up and be spreadable again.

Spread on some toasted Keto Bread for a healthy and quick low-carb breakfast, or how about surprising your loved one by making a batch and giving as a gift for Valentine’s Day or your mum for Mother’s Day? It’s so pretty.

Preparation time
Hands-on:    15 minutes
Overall:      1 hour
Nutritional values (per serving, 1 tbsp, 15 g/0.5 oz)
Total Carbs 1.1 grams
Fiber 0.3 grams
Net Carbs 0.9 grams
Protein 0.2 grams
Fat 0 grams
of which Saturated 0 grams
Energy 5 kcal
Magnesium 2 mg (1% RDA)
Potassium 22 mg (1% EMR)

Macronutrient ratio: Calories from carbs (73%), protein (18%), fat (9%)

Ingredients (makes about 2 cups/ 480 ml)
  • 450 g strawberries, fresh or frozen & thawed (1 lb)
  • 2 tbsp Erythritol or Swerve (20 g/ 0.7 oz), or few drops of liquid stevia (sweetener can be omitted, or add more sweetener to taste)
  • 1 tbsp fresh lemon or lime juice (15 ml)
  • 1 1/2 tsp grass-fed gelatin powder (5 g/ 0.2 oz)
  • 1 - 2 tbsp water
Instructions
  1. Place the gelatin to a small bowl. Add the water and mix, leave to bloom whilst you prepare the strawberries.

  2. Place the strawberries in a blender and blitz until smooth.

  3. Transfer to a muslin cloth and squeeze out the juice. If you prefer your jam a little chunky you can omit this step and use the whole mixture, otherwise, discard the pith (nutrition facts include the pith).
  4. Place half of the strawberry juice in a sauce pan. Heat on a medium-low heat and add the bloomed gelatin. Stir until melted.
  5. Remove from the heat and add the lemon juice, optional sweetener and rest of the strawberry juice. Stir.

  6. Place in a jar and allow to cool. Once cool, transfer to the fridge for about 30 minutes or up to 1 hour to set. If you like more of a set jam, please use as is. If you prefer a softer jam, give the jam a really good stir until it loosens up and is smooth.
  7. Store in an airtight glass jar in the fridge. When using straight from the fridge, allow to bring to room temperature to loosen up and giving it a big stir again.
  8. This strawberry jam can be stored in fridge for up to 1 week.

http://bit.ly/2HCyWpv

Monday, January 28, 2019

3 Ingredient Keto Chocolate Truffles

Truffles are a personal favorite of mine, growing up my family owned a restaurant and one of my jobs was to make truffles.

Bourbon, mint, orange, you name it. My husband and I also had lavender truffles as our wedding flavors. You could say I love truffles but I especially love these keto truffles. They are also some of the easiest fat bombs you can make!

With just 3 ingredients: dark chocolate, heavy cream (or coconut milk, or even unsweetened almond milk), and cocoa powder this is a great base recipe to jump off of to create your own flavors, although they’re great as is.

If you’d like to spice them up a bit I’d start by adding 1 teaspoon of a flavoring such as vanilla, maple, mint, almond, or orange extract. It's the perfect threat for Valentine's Day or Mother's Day!

Let us know in the comments how you end up flavoring your batch!

Join my giveaway! Visit my YouTube Channel and check the description of my video for details.

Preparation time
Hands-on:    10 minutes
Overall:      2 hours
Nutritional values (per truffle)
Total Carbs 3.8 grams
Fiber 1.3 grams
Net Carbs 2.5 grams
Protein 1.9 grams
Fat 12 grams
of which Saturated 6.7 grams
Energy 119 kcal
Magnesium 41 mg (10% RDA)
Potassium 130 mg (7% EMR)

Macronutrient ratio: Calories from carbs (8%), protein (6%), fat (86%)

Ingredients (makes 16 truffles) Instructions
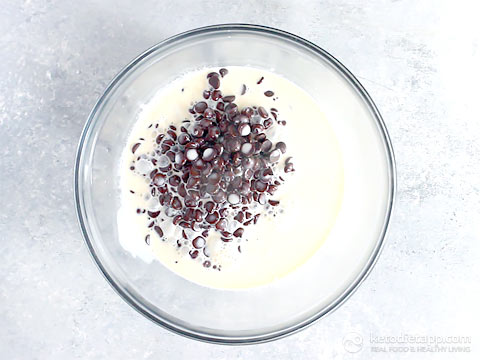
  1. Place the chocolate in a large heatproof bowl.
  2. Heat the cream plus any flavoring (try cinnamon or vanilla, mint, orange, maple or almond extract) a small pot over medium heat until simmering. Pour the hot cream over the chocolate.
  3. Let the chocolate soften for a minute or two, and then gently stir to melt.
  4. Transfer to the refrigerator to chill for 1 to 2 hours.
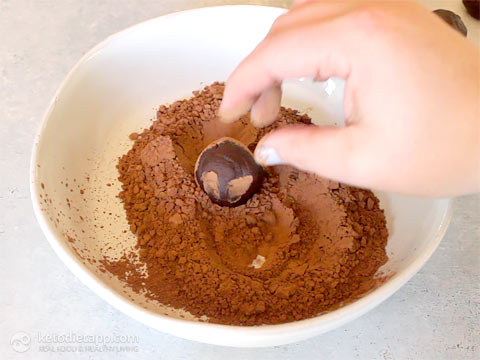
  5. Once chilled use a spoon to scoop up a small amount (about 24 g/ 0.9 oz) of the mix and roll into a ball. Repeat with remaining chocolate and place truffles in an airtight container to store.
  6. Roll each ball in cacao powder.
  7. Store in an airtight container in the refrigerator for up to one week.
http://bit.ly/2RXIQHn

Friday, January 25, 2019

Low-Carb Kimchi Fried Cauli-Rice

Kimchi is all the rage right now and for good reason, it’s so good for your gut health. It’s really important that we look after our guts and keep the healthy bacteria in check. Having a happy gut and super strong gut lining is the key to improved health. If you love it then you have to try this cauliflower rice recipe.

Packed so full of flavour, your tastebuds will be tango’ing that’s for sure!

Optionally, you can swap the eggs for your favourite side of protein. I love it with crispy chicken thighs or a piece of roast salmon. Speedy and tasty, it’s one you’ll make time and time again.

Looking for more similar recipes? Make sure to check out our gut-healthy keto recipes!

Preparation time
Hands-on:    20 minutes
Overall:     20 minutes
Nutritional values (per serving)
Total Carbs 12.1 grams
Fiber 4.3 grams
Net Carbs 7.8 grams
Protein 10.4 grams
Fat 24.9 grams
of which Saturated 9.7 grams
Energy 308 kcal
Magnesium 42 mg (11% RDA)
Potassium 663 mg (33% EMR)

Macronutrient ratio: Calories from carbs (11%), protein (14%), fat (75%)

Ingredients (makes 4 servings) Spring onion topper: Kimchi Cauliflower Rice:
  • 1 medium cauliflower (600 g/ 1.3 oz)
  • 1/2 small brown onion, finely chopped (35 g/ 1.2 oz)
  • 2 tbsp ghee or virgin coconut oil (30 ml)
  • 2 garlic cloves, minced (6 g/ 0.2 oz)
  • 1 tbsp grated ginger (6 g/ 0.2 oz)
  • raw kimchi (120 g/ 4.2 oz)
  • 1 tbsp coconut aminos (15 ml)
  • 2 tbsp lime juice (30 ml)
  • pinch sea salt (or to taste)
  • 1/2 tsp black pepper, or to taste
  • 1 tbsp ghee or virgin coconut oil to fry the eggs
  • 4 large eggs
To Serve:

Note: You can find a homemade kimchi recipe in the Quick Keto Book. If you are following a vegetarian keto diet, keep in mind that kimchi typically contains fish sauce but you can find many vegetarian or vegan products that exclude it.

Instructions
  1. First, prepare the topper. Finely slice the spring onions. Mix with the dressing and place to one side.
  2. Place the cauliflower florets in a high speed food processor and pulse until they resemble a rice consistency.

  3. Microwave for 5 minutes (or steam for 8 - 10 minutes until soft). Allow to cool then transfer to a muslin cloth and squeeze out the excess water. This is my top tip to get super fluffy cauliflower rice!
    Note: Alternatively, simply add the raw cauli-rice in step 6 before the kimchi) and pan-fry uncovered for 5-7 minutes.
  4. Drain the kimchi, but keep the juice to one side.

  5. Heat the ghee or coconut oil in a non stick or cast iron pan. Add the onion and fry on a medium-low heat for 1 - 2 minutes until soften. Add the garlic and ginger and fry for another 30 seconds.
  6. Add the kimchi for another 1 - 2 minutes until sticky. Next, add the cauliflower rice to the kimchi mix and the juice.
  7. Turn off the heat. Stir through the coconut aminos. Add the lime juice and season with salt and pepper to taste. Heat 1 tbsp of ghee or coconut oil in a non stick frying pan.
  8. Fry the eggs to your liking. Top the kimchi fried cauli-rice with fried eggs, spring onions and sriracha sauce. Drizzle with olive oil.
  9. Eat immediately. The kimchi fried cauli-rice (without the fried egg) can be stored in the fridge for up to 4 days, and can be reheated or eaten cold. Fried eggs are best prepared just before serving.
http://bit.ly/2G0F6xf

Thursday, January 24, 2019

Sugar-Free Raspberry Chocolate Jellies

I’m big into collagen-rich gummies at the moment. You’ve probably seen my Strawberry and Lime Jellies, Blackberry and Coconut Jellies, Raspberry Prosecco Jellies, Spooky Blackberry Halloween Bats and Spiced Carrot Jellies here on the KetoDiet Blog, well today i’m back with a special treat for Valentine’s Day. These Dark Chocolate Raspberry Jellies!

Made with gut loving grass-fed gelatin and allergy friendly. They contain just natural fruit, no added sugars and sweeteners, but of course, if you like things a little sweeter you can add a keto friendly sweetener from the list like powdered Erythritol, Swerve or liquid stevia.

Feel free to use any silicone mould you like, they’re not just for Valentine’s Day or Mother's Day… but if you do make these sugar-free gummies for your loved one, I’m pretty sure you’ll get extra brownie points!

Preparation time
Hands-on:    20 minutes
Overall:      2 hours
Nutritional values (per jelly)
Total Carbs 2.3 grams
Fiber 1 grams
Net Carbs 1.3 grams
Protein 3.5 grams
Fat 2.9 grams
of which Saturated 1.5 grams
Energy 45 kcal
Magnesium 15 mg (4% RDA)
Potassium 53 mg (3% EMR)

Macronutrient ratio: Calories from carbs (11%), protein (31%), fat (58%)

Ingredients (makes 20 jellies) Instructions
  1. Place the gelatin in a bowl. Add the water and allow to bloom.
  2. Blitz the raspberries in high speed blender until smooth. Place in a muslin cloth and squeeze out the juice. Discard the pith.
  3. Add about half of the raspberry juice to a pan. Heat on a medium setting and add the gelatin. Stir until melted.
  4. Remove from the heat and stir through the remaining juice. Skim off any froth if needed and pour into your silicone jelly moulds. Place in the fridge to set for 1-2 hours.
  5. Once set, remove the jellies from the moulds.
  6. Meanwhile, melt the dark chocolate in a small bowl or glass jug on top of pan filled with a cup of water over a medium heat. When melted remove from the heat.
  7. To make the holder, chop the bottom off a turnip or another hard vegetable like a beetroot, cover in tin foil and place on a baking tray.
  8. Insert a toothpick into each jelly (making sure not to skewer all the way through) and dip into the chocolate.
  9. Shake off any excess and skewer into your ‘turnip’ to allow to dry. Repeat until all the jellies have been dipped in chocolate.
  10. Allow to reach room temperature then place in the fridge to set for about 15 - 30 minutes.
  11. Store in room temperature or in a fridge for 4 - 5 days.
http://bit.ly/2sIqWcn

Tuesday, January 22, 2019

Announcing the KetoDiet Quiz!

Hi Friends, I have great news for you! For the last few weeks we've been working hard on a new free new tool to help you learn about healthy low-carb eating in a fun and intuitive way.

The KetoDiet Quiz it now available on our website — Feel free to give it a try!

Every quiz is composed of 15 questions that get progressively harder. After you take the quiz, you can check your score in detail and read all the relevant references for the correct answer.

I know how busy life can get and I bet many of you barely have time to read all the keto guides in detail. We want to make it easier and more fun for you to help you make healthy decisions.

The first version includes hundreds of different questions from keto nutrition and we plan to keep adding more.

Enjoy and let me know what score you got by sharing it on Twitter, Facebook, or Instagram with the hashtag #ketodietquiz!

http://bit.ly/2T9bcdY